Specflow
SpecFlow is a test automation solution for .Net, using Behavior-Driven Development (BDD). BDD tries to fill the gap between software developers, and people standing more away from software development. By using natural language to describe tests, also these people can read a test specification and understand what it does.
SpecFlow supports programming languages like C#, JavaScript, Ruby and Kotlin. There are also plugins that enable C++ support.
Describing test using natural language
SpecFlow uses the Gherkin language to let the user describing tests. This makes a test readable by a human, and allows not only tech people to understand what a test does.
Within SpecFlow, a test is called a feature. The syntax of a feature is stored within a file having the extension “feature”, so for example MyFirstSpecflowFeature.feature.
The Gherkin language has the following structure:
- Given
Sets up the initial context - When
Describes the guard that is expected to happen - Then
Defines what should happen when the “when”-guard evolves to true
The following example illustrates this structure:
Given That I'm in a car that has a running engine
When I press with my foot on the gas pedal
Then The car starts to move
Besides given, when and then, SpecFlow has another set of keywords to describe a test more specifically like and or but.
Tests can also be grouped in scenario’s, and scenario’s itself can be grouped in a feature.
Example application
To the rest of this blog post we will use the following example to make things more thangable. Let’s say we have an application, that contains two buttons: “Add” and “Remove” and one input field “Add/Remove vlaue”. When we enter a value in “Add/Remove value”, let’s say 1 and we press “Add” a field “Result” gets a value “1”. When pressing another time on “Add”, “Result” becomes 2.
When pressing on “Remove” the value of “Add/Remove value” will be extracted from “Result”. So when “Add/Remove value” still contains the value 1 and we press “Remove”, then “Result” gets the value 1.
The UI looks like this:

To test the add button, we could write for example a feature file that tests if when the initial value is 0, we place value 1 in the “Add/Remove” field and press the add button the result shows 1:
Scenario: Testing the add button
    Given The application is started
    And the result value shows 0
    When I place value 1 in the box to be added or removed
    When I press one time on the add button
    Then the result value shows 1
From feature file to executable code
The feature file itself can’t be executed by a computer, since it is contains just the specification written in Gherken. Although the feature file could be processed by a compiler that can create machine code out of the Gherkin language, the process goes a little bit different. Within SpecFlow, the feature file will be translated in a computer language that is supported by SpecFlow along with a testing framework that will take care of the actual execution and validation of the tests.
For example, if we choose as programming language C# together with the testing framework NUnit, the feature file will be constructed in such a way it can be executed in NUnit and uses the C# programming language. Besides C#, SpecFlow is able to handle more programming languages like JS, Ruby and Kotlin. It also supports C++ with the help of a plug-in.
Installing SpecFlow within Visual Studio
To create automated tests using SpecFlow within Visual Studio, you first have to install the “SpecFlow for Visual Studio” extension. Within Visual Studio go to “Extensions->Manage Extensions”. From here, within the search-bar enter “SpecFlow for Visual Studio” and press enter. On the list of available extensions that appear, click on “install” for the “SpecFlow for Visual Studio” extension.
We have to install two sets of plug-in’s that allows us to run our SpecFlow tests within Visual Studio. At least you need to have the “SpecFlow” package and depending on which test framework you want to use, you need to have an additional package installed that is specifically for the test framework you are using. This package has the naming SpecFlow.[TestFramework]. For example, when using NUnit, this package is called SpecFlow.NUnit. When using NUnit, you also need SpecFlow.NUnit.Runners.
Translating Gherkin to programming code
Now we’ve installed the plugin’s you will be able to generate C# files out of the spec files, which contain the Gherkin language. The language specific code, together with the syntactic sugar that allows the file to be executed by the testing framework, will be created within Visual Studio when you right-click on your feature file and select “Run Custom Tool” when using .Net Framework. Within .Net Core the code behind will be automatically generated. You also won’t see the generated code within Visual Studio.

When you open a file explorer and go to the location where the feature file resides, you will see the same file name, but then with a CS-extension in case you selected C# as your programming language. When looking into this folder, you will see that the file contains code that calls both elements within the Specflow and NUnit framework.
Implementing the steps from a feature file
When closely looking into the generated file you will see for example that the following line within our Gherkin spec-file:
Given The application is startedIs converted to:
testRunner.Given("The application is started", ((string)(null)), ((TechTalk.SpecFlow.Table)(null)), "Given ");We need to define what needs to be done when calling The application is started. This is done in what Specflow calls a step-file. The convention name for the steps file is [FeatureName]Steps.cs. The methods within a step file actually forms a bridge between the natural language and a computer language. SpecFlow calls this bridge bindings. In order to let Specflow find the proper methods, you have to add the [Binding] attribute before the class definition of your step file:
[Binding]
internal class HelloSpecFlowSteps {
Within the step-file we define now a method, which contains the code which must be executed when the step The application is started is being executed:
[Given("The application is started")]
internal void GivenApplicationIsStarted() { ...
The Given-attribute, takes care of the binding between the step file and the text of the step itself defined between quotes. So when executing the method testRunner.Given("The application is started"... this attribute will make sure that Specflow executes our method GivenApplicationIsStarted when processing the step The application is started.
Besides the Given attribute, you have also a When and Then attribute to mark the test steps that begin with When and Then. For a test step beginning with And you can either use the When or Then attribute.
High level overview
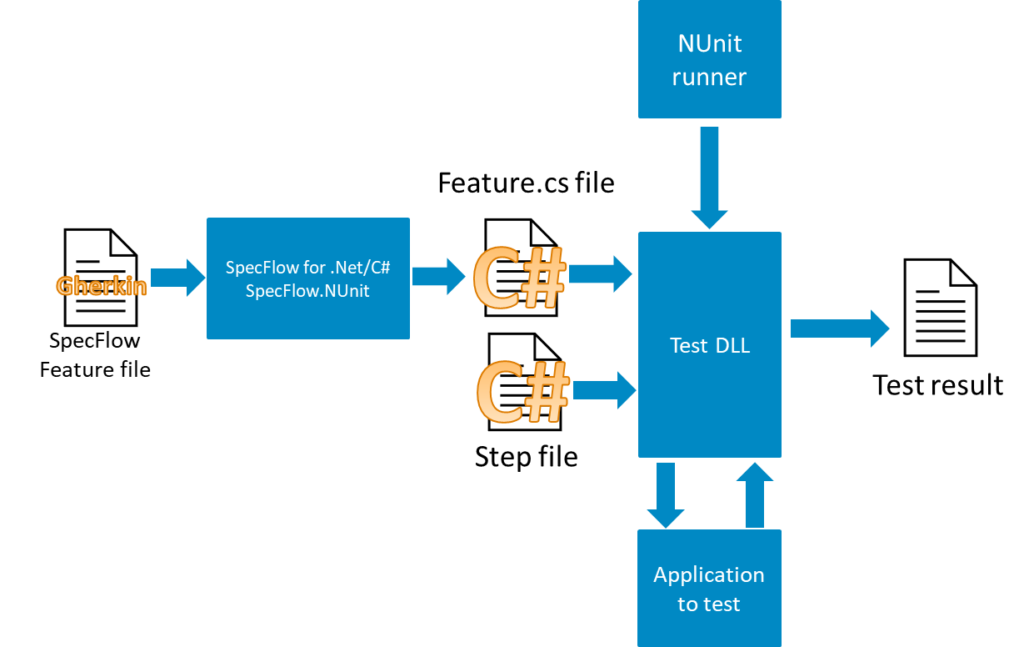
So we covered how we write down a test script, and that it will be converted by Specflow in a file using the programming language you specified. You define the actions that needs to be taken in the step-file. The feature file and the step file will be used by the testing framework. The testing framework will validate the steps within your test and validate them against the application you are testing. This in the end will result in a test result file. The diagram below shows the several files and components and the relationship between them.
Running the test
We have to use the same mechanism as we normally would execute a test in the testing framework we defined. In NUnit this could be by using the nunit3-console.exe on the command line and provide the library that was created by your test solution as the project to test. Another option is to use the Test Runner within Visual Studio.
Interacting with UI’s
There are a couple of frameworks that allows you to interact with the UI. For example TestStack.White or Selenium. I focus for now on TestStack.White. This framework can interact with WinForms, WPF and other frameworks. As a façade, it uses the Microsoft’s UIAutomation library in order to interact with the UI.
Starting the application to test
When using TestStack.White, to start an application, you can use the following:
Application application = Application.Launch(applicationPath);Define in applicationPath the path to the executable of the application you want to test. In our test application, the main window has the title “Add remove app”. On order to retrieve a handler to the window we can call:
var window = application.GetWindow("Add remove app", InitializeOption.NoCache);Our step The application is started will start the application and check if the proper window is shown. We can obtain this in the following way:
[Given("The application is started")]
internal void GivenApplicationIsStarted() {
  var applicationPath = Path.Combine(applicationFullPath, applicationExeName);
  Application application = Application.Launch(applicationPath);
  window = application.GetWindow("Add remove app", InitializeOption.NoCache);
  Assert.IsNotNull(window);
}
Using variables in steps
Our following step the result value shows 0 checks if the value 0 is shown on the screen within the textbox. Since we also check this value add the end within the step Then the result value shows -1, we will use a generic approach which allows us to check for any value.
Steps are defined using a string. In order to pass on a variable, we need to use regular expressions. To pass on a certain text we use the regular expression (.*). This defines any character, which can be repeated 0 or more times.
We define the attribute above our new method as follows:
[Given("the result value shows (.*)")]Here we describe our step is defined as the result value shows. Any text beyond this description will be passed on as an string to the method. To allow our method to use this string, we have to define a parameter within our method, which is of the type string:
[Given("the result value shows (.*)")]
internal void ThenTheResultValueShows(string value)
Remember back our UI, which we shown above:
Here we have a text-box called “ResultValue”. In order to get the text-box itself we use within TestStack.White:
var valueTextBox = window.Get("ResultValue");To check if the value, we defined in our step, is the same as shown on the UI we now compare the value of the text-box against the value that was passed on in our method parameter:
Assert.AreEqual(Convert.ToInt32(value), Convert.ToInt32(valueTextBox.Text));Note, since we passed on a string, we need to convert this to a integer by using Convert.ToInt32(value).
Now the method will look like this:
[Given("the result value shows (.*)")]
internal void ThenTheResultValueShows(string value) {
  var valueTextBox = window.Get("ResultValue");
  Assert.AreEqual(Convert.ToInt32(value), Convert.ToInt32(valueTextBox.Text));
}
To bind the method also to the step Then the result value shows -1, we add another attribute above the method: [Then("the result value shows (.*)")]. So in the end our method will look like this:
[Given("the result value shows (.*)")]
[Then("the result value shows (.*)")]
internal void ThenTheResultValueShows(string value) {
  var valueTextBox = window.Get("ResultValue");
  Assert.AreEqual(Convert.ToInt32(value), Convert.ToInt32(valueTextBox.Text));
}
Pressing buttons
To implement the step When I press one time on the remove button, we need to press the button on the screen. Now to get the button with the name “AddButton” we call:
var addButton = window.Get("AddButton");The button has several properties, for example we can call Click in order to click on the button. In this way we can simulate the behavior of an end user using the UI. Below an example how we could implement this step:
[When("I press one time on the add button")]
internal void WhenIPressOneTimeOnTheAddButton() {
  var addButton = window.Get("AddButton");
  addButton.Click();
}
Debugging
By default, you can’t debug the generated files that come out of the feature files. If you want to debug them add the following line to the <specflow> section within the app.config file:
<generator allowDebugGeneratedFiles="true"/>Next steps
This blog only demonstrated the basic steps into BDD using SpecFlow. With the use of these basic steps, you should be getting started in creating your own test solutions using SpecFlow. For more information check out the official Specflow website at https://specflow.org/.